
The lovely Fran Bott of the RLR Creations testing team has put together a photo tutorial along with some tips on assembling the new Teardrop Sport for the test team, and has graciously allowed me to share it here with everyone.
The Teardrop Sport is a sling style backpack that was designed to be the sporty version of the popular Teardrop Sling Bag. It was designed with the purpose of being for an active guy on the go. Designed for the guys but equally handy for adventurous girls too!

Bag and photos by Fran Bott

You can find the newly released Teardrop Sport Backpack Sling here: http://www.rlrcreations.com/pdfpatterns/teardropsport
I have had many requests for a "guy" version for the popular Teardrop Sling bag and when it came time to design it I asked the Test Team for their opinions on what they would like to see be done differently. The most popular request was to design it so that it did not have to be finished with a "Drop-in" lining, and that it had an exposed zipper for easier opening. So, I set off to create a way to accomplish this without it needing to be complicated or take many more steps to complete.
So without further Ado, let's see how it is done!
Tutorial and Photos by Fran Bott
Attach the Gusset Panels to the Zipper Panels
-Starting on Page 22 of the written Instructions of the Teardrop Sport
Add the finished Exterior Gusset Panel to the Main Fabric side of the Zipper Panel
When adding the Main Opening Zipper to the Zipper Panel pieces the last 1/2" at the ends of the Zipper Panel was left unstitched to allow us to separate the Main Fabric from the Lining fabric so we can add the Gussets to the Zipper Panel.
Page 22-23 Steps 1-3
Separate the Main Fabric and Lining Fabric pieces of the Zipper Panel along the short raw ends. Pin the Exterior Gusset Panel short raw edges to the Main Fabric short raw edges of the Zipper Panel, right sides together. Pull the lining fabric away from the zipper end and clip or pin out of the way.
Be sure that you are pinning the Gusset to the Zipper Panel so that the zipper pocket on the Gusset faces the top of the zipper on the Zipper Panel.
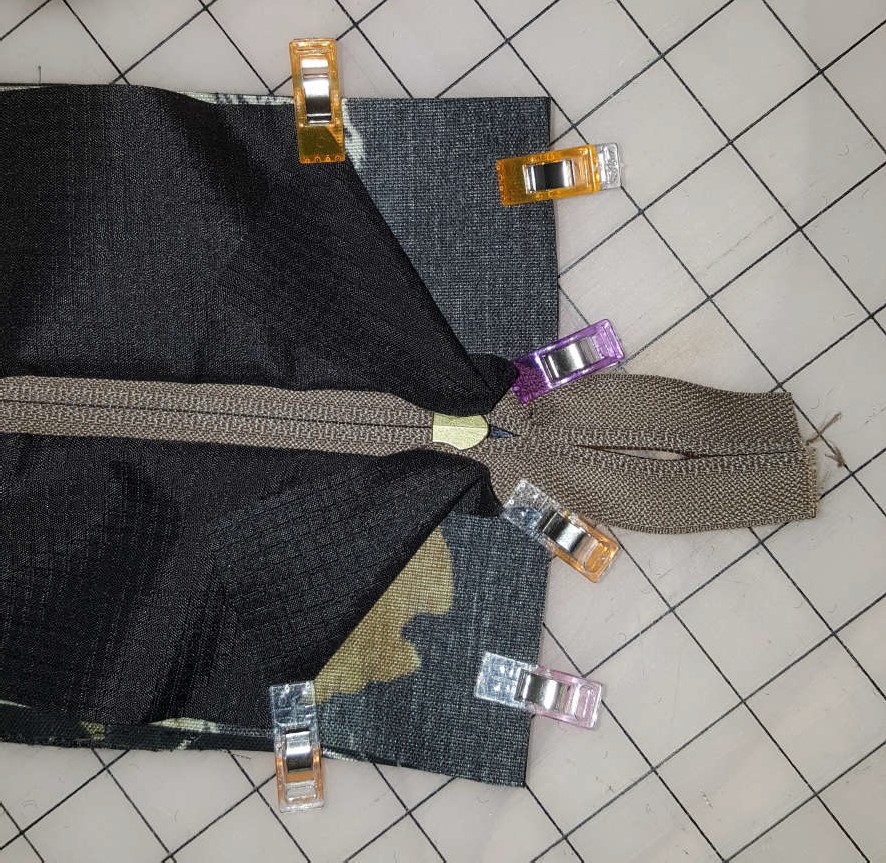
Once you have the Exterior Gusset pinned to the Main Fabric side of the Zipper Panel stitch across with a 1/2" seam allowance.
As you stitch over the zipper, you will want to use something besides your fingers to hold back the lining fabric, I have a small screwdriver that I use, but you can use whatever works for you – a small pair of scissors, an awl, etc.
This is how it looks after you have stitched the pieces together-


Follow the directions on Page 23-Step 4 to press and topstitch along the seams on the Exterior Fabric. Be sure you keep the interior side out of the way as you do not want to stitch it to the Main Fabric.
Add the Interior Gusset Panel to the Lining Fabric Side of the Zipper Panel
Page 23 Step 5
Turn the piece over so that the Lining Fabric side is facing you.
Next, you will add the Interior Gusset Panel to the Lining Fabric side of the Zipper Panel in the same manner. Folding back the zipper end and the Main Fabric side of the Zipper Panel.
I use my screwdriver to hold back the Exterior Side while adding the Interior Gusset piece to the ends of the Lining fabric side of the Zipper Panel . I use zipper tape so I have to hold that back to sew the lining on. I use my zipper foot with the needle on the left to get in close. That is why I recommended something other than your fingers to hold the fabric or tape back.


Your piece will now resemble a circle with the two Gusset pieces WRONG SIDES TOGETHER, with the Interior Gusset on one side and the Exterior Gusset on the other side.

Align the raw edges of the Interior and Exterior pieces on the Zipper Panel so everything lays nice and flat. Follow the directions on Page 24 , Step 7 to complete the topsitching along the zipper on the Zipper Panel.
Add the Main Panels:

The Interior Main Panels are sewn to the Interior Gusset Side with the Main Panels and the Gusset right sides together.
Lining Panels – The photo on the left shows Lining Panel pinned at the marks referred to on Step 3 on Page 24 of the pattern.
Page 24-25 Steps 5-6

Interior Main Panel pinned to the Lining Fabric side of the assembled Gusset. Be sure the Exterior side of the Gusset is pushed out of the way.

Page 25 Step 7
Stitch all the way around the pinned pieces with a 5/8" seam allowance. Trim your seam allowances and then flip the piece over and with the Exterior piece out of the way add the second Interior Main Panel to the other side of the Interior Gusset piece.
Now open the Main Opening Zipper and the Front Pocket Zipper on your Exterior Front Main Panel all the way. At this point, you can stitch the Exterior Main Panels to the Exterior Gusset piece, following the same steps as for the Interior. You will want to stitch the Exterior pieces together with a 1/2" seam allowance.

I like to get the lining panel out of the way so I don’t have to keep moving it when sewing. Since your Main Zipper is open, push the lining into the middle of the main gusset. It should look like this:
The main gusset should be wrong side out when attaching the Exterior Main Panels, the finished Interior will be sandwiched in between the Exterior Main Panels.
.
Page 25 Steps 1-4
Attach the Exterior Panels to the Exterior Gusset the same way as you finished the interior, only this time stitch the pieces together with a ½” seam allowance.
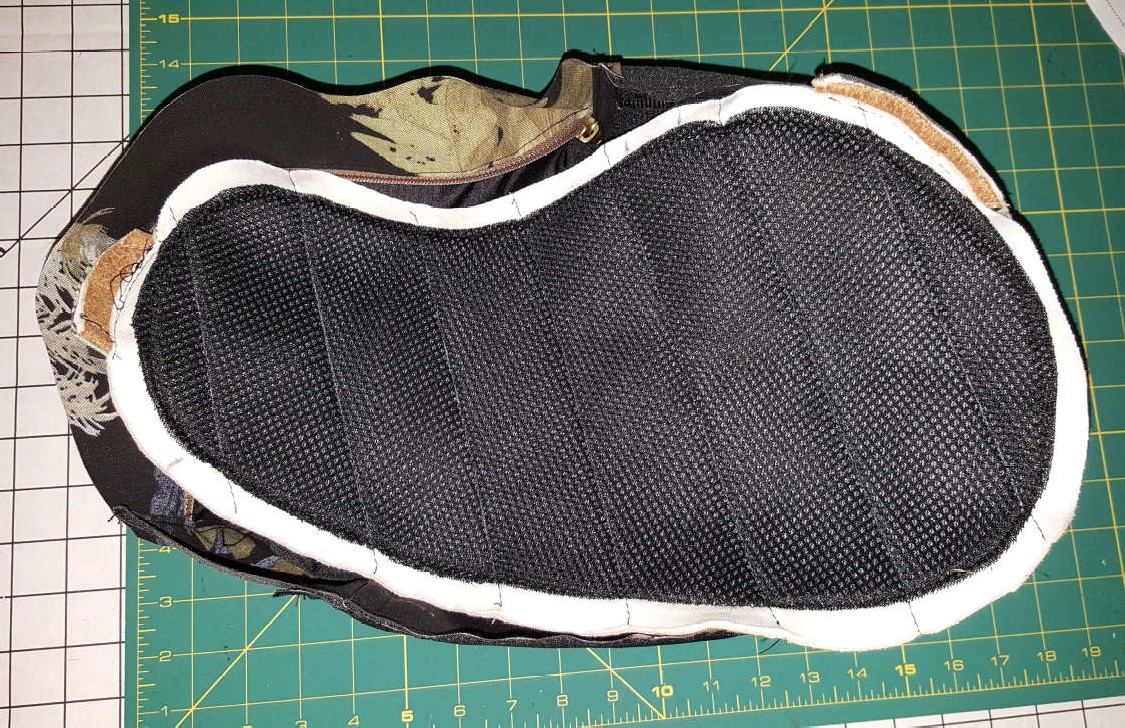
It should look like this.

I have the lining pushed out of the way so you can see the panel.
Now is time to attach the Exterior Back Main Panel. This panel has the Strap and Connectors attached to it. Be sure your Lining is pushed to the inside so it will be out of the way. Fold the Strap and the Bottom Connector pieces so that when you set the Exterior Back Panel on top these pieces will sit inside the bag and away from the edges of the Panel piece:
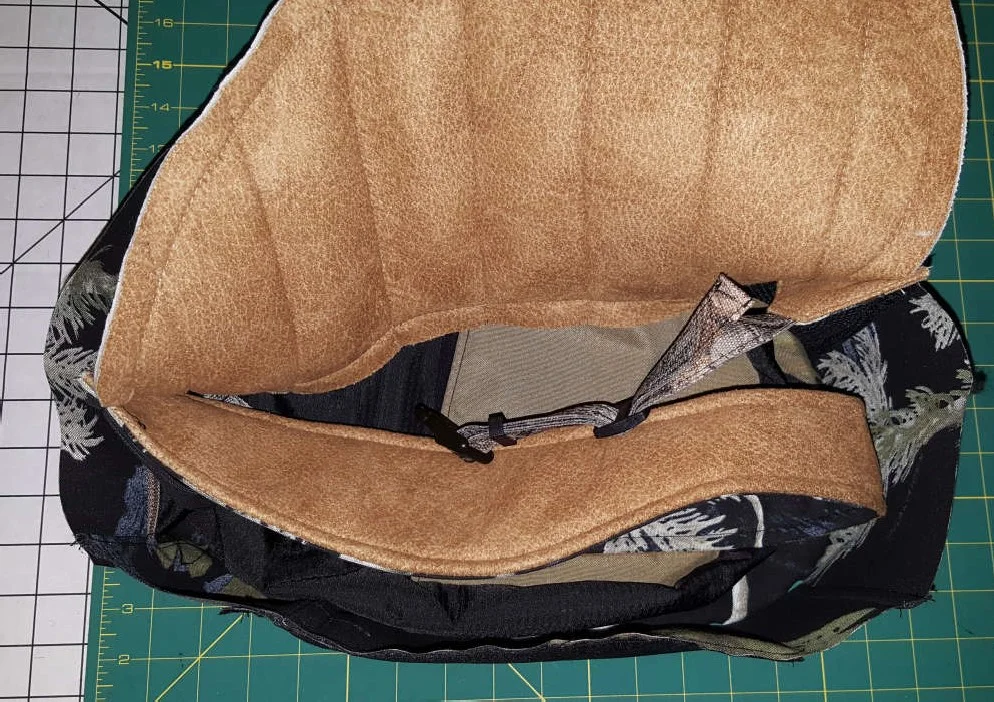
Everything, including the Lining will be out of the way when you sew this last Panel in place.
Pin the Exterior Panel to the Exterior Gusset and then stitch all the way around with a ½” seam allowance as you did for the Exterior Front Panel.
When completed and everything is trimmed reach through the opening you left at the bottom of the Front Pocket
lining pieces and pull everything through to turn the bag right side out. The opening left in the pocket lining makes for very easy birthing.
Push the interior through the Main Zipper opening so it is on the inside of the bag.
Follow the Finishing steps on pages 26 and 27 to close your zipper pocket lining and add the rest of your hardware.

If you have any questions while creating your very own Teardrop Sport please hop over to the RLR Creations Facebook Group: facebook.com/groups/RLRCreationsSewingPatterns/ and let us know as Fran, myself, and many other testers are always happy to help!
We would love to see your finished Teardrop Sport bags, please post them in the RLR Creations Facebook group using that month's hashtag for a chance to win a free pattern monthly.
Without my talented testers, like Fran Bott, I would not be able to bring you the unique patterns that are published monthly. They are the true talent behind RLR Creations Sewing Patterns. A huge thank you again, to Fran Bott for the picture tutorial on completing the Teardrop Sport.